Install DC/OS on CentOS on VMWare FreeESXi
Prerequriement
- DC/OS: 1.9
- CenOS: 7.3
- Minimum 4 nodes
- Bootstrap node: 1 node with 2 Cores, 16 GB RAM, 60 GB HDD
- 3 Nodes(1 Master and 2 Agent nodes): 2 cores, 16GB RAM, 60GB
Referecne
DC/OS Official Installation
DC/OS Install
Install CentOS
During installing the CentOS, create user called dcosadmin and check administrator group. This user will be used during entire installation process
I used 4 nodes as DC/OS recommended
| ComputerName |
IP Addess |
Computer Spec |
Description |
| dcostest01 |
172.16.110.20 |
2 core, 16GB, 100 GB Disk |
Bootstrap Computer |
| dcostest02 |
172.16.110.30 |
2 core, 16GB, 100 GB Disk |
Agent1-Master |
| dcostest03 |
172.16.110.31 |
2 core, 16GB, 100 GB Disk |
Agent2-Agent Public |
| dcostest04 |
172.16.110.32 |
2 core, 16GB, 100 GB Disk |
Agent3-Private |
Create One CentOS with following configuration
First of all couple of changes will be needed to apply
- Verify that the kernel is at least 3.10:
uname -r
3.10.0-514.el7.x86_64
-
To use the GUI or CLI installation methods, you must disable password prompts for sudo.
Add the following line to your /etc/sudoers file. This disables the sudo password prompt.
%wheel ALL=(ALL) NOPASSWD: ALL
-
Enable NTP
Network Time Protocol (NTP) must be enabled on all nodes for clock synchronization. By default, during DC/OS startup you will receive an error if this is not enabled. You can check if NTP is enabled by running one of these commands, depending on your OS and configuration:
If ntptime is not existing, install ntptime with sudo yum install ntp
[dcosadmin@dcostest01 ~]$ sudo yum install ntp
[dcosadmin@dcostest01 ~]$ sudo ntptime
ntp_gettime() returns code 0 (OK)
  time dc964536.ca5236b8  Mon, Apr 10 2017 11:53:58.790, (.790317666),
  maximum error 365761 us, estimated error 7054 us, TAI offset 0
ntp_adjtime() returns code 0 (OK)
  modes 0x0 (),
  offset 0.000 us, frequency 38.957 ppm, interval 1 s,
  maximum error 365761 us, estimated error 7054 us,
  status 0x2000 (NANO),
  time constant 2, precision 0.001 us, tolerance 500 ppm,
[dcosadmin@dcostest01 ~]$

# can't find this command from centos 7 adjtimex -p
[dcosadmin@dcostest01 ~]$ timedatectl
      Local time: Mon 2017-04-10 11:58:22 MDT
  Universal time: Mon 2017-04-10 17:58:22 UTC
        RTC time: Mon 2017-04-10 17:58:22
       Time zone: America/Edmonton (MDT, -0600)
     NTP enabled: yes
NTP synchronized: yes
 RTC in local TZ: no
      DST active: yes
 Last DST change: DST began at
                  Sun 2017-03-12 01:59:59 MST
                  Sun 2017-03-12 03:00:00 MDT
 Next DST change: DST ends (the clock jumps one hour backwards) at
                  Sun 2017-11-05 01:59:59 MDT
                  Sun 2017-11-05 01:00:00 MST
[dcosadmin@dcostest01 ~]$
Changing Timezon Ref in Centos
[dcosadmin@dcostest02 ~]$ sudo rm -rf /etc/localtime
[dcosadmin@dcostest02 ~]$ sudo ln -s /usr/share/zoneinfo/America/Edmonton /etc/localtime
[dcosadmin@dcostest02 ~]$
sudo tee /etc/modules-load.d/overlay.conf <<-'EOF'
overlay
EOF
- Reboot to reload kernel modules:
[dcosadmin@dcostest01 ~]$ sudo systemctl reboot
- Verify that OverlayFS is enabled:
[dcosadmin@dcostest01 ~]$ lsmod | grep overlay
overlay                47399  0
[dcosadmin@dcostest01 ~]$
[dcosadmin@dcostest01 ~]$ sudo systemctl stop firewalld && sudo systemctl disable firewalld
Removed symlink /etc/systemd/system/dbus-org.fedoraproject.FirewallD1.service.
Removed symlink /etc/systemd/system/basic.target.wants/firewalld.service.
[dcosadmin@dcostest01 ~]$
- Install dig utility
To detect IP, DC/OS uses dig command during post-flight process and this is not installed as default.
[dcosadmin@dcostest02 bin]$ sudo yum install bind-utils
Loaded plugins: fastestmirror
Loading mirror speeds from cached hostfile
 * base: centos.mirror.rafal.ca
 * extras: mirror.its.sfu.ca
 * updates: mirror.it.ubc.ca
Resolving Dependencies
--> Running transaction check
---> Package bind-utils.x86_64 32:9.9.4-38.el7_3.2 will be installed
--> Processing Dependency: bind-libs = 32:9.9.4-38.el7_3.2 for package: 32:bind-utils-9.9.4-38.el7_3.2.x86_64
--> Processing Dependency: liblwres.so.90()(64bit) for package: 32:bind-utils-9.9.4-38.el7_3.2.x86_64
--> Processing Dependency: libisccfg.so.90()(64bit) for package: 32:bind-utils-9.9.4-38.el7_3.2.x86_64
--> Processing Dependency: libisccc.so.90()(64bit) for package: 32:bind-utils-9.9.4-38.el7_3.2.x86_64
--> Processing Dependency: libisc.so.95()(64bit) for package: 32:bind-utils-9.9.4-38.el7_3.2.x86_64
--> Processing Dependency: libdns.so.100()(64bit) for package: 32:bind-utils-9.9.4-38.el7_3.2.x86_64
--> Processing Dependency: libbind9.so.90()(64bit) for package: 32:bind-utils-9.9.4-38.el7_3.2.x86_64
--> Running transaction check
---> Package bind-libs.x86_64 32:9.9.4-38.el7_3.2 will be installed
--> Finished Dependency Resolution

Dependencies Resolved

=================================================================================================
 Package               Arch              Version                        Repository          Size
=================================================================================================
Installing:
 bind-utils            x86_64            32:9.9.4-38.el7_3.2            updates            202 k
Installing for dependencies:
 bind-libs             x86_64            32:9.9.4-38.el7_3.2            updates            1.0 M

Transaction Summary
=================================================================================================
Install  1 Package (+1 Dependent package)

Total download size: 1.2 M
Installed size: 3.0 M
Is this ok [y/d/N]: y
Install Docker
- Configure yum to use the Docker yum repo:
sudo tee /etc/yum.repos.d/docker.repo <<-'EOF'
[dockerrepo]
name=Docker Repository
baseurl=https://yum.dockerproject.org/repo/main/centos/$releasever/
enabled=1
gpgcheck=1
gpgkey=https://yum.dockerproject.org/gpg
EOF
- Configure systemd to run the Docker Daemon with OverlayFS:
sudo mkdir -p /etc/systemd/system/docker.service.d && sudo tee /etc/systemd/system/docker.service.d/override.conf <<- EOF
[Service]
ExecStart=
ExecStart=/usr/bin/dockerd --storage-driver=overlay
EOF
- Install the Docker engine, daemon, and service.
I tried to install with generic docker version with 17.04.0, but it didn't work with dc/os installer. Please use the specific version shown below.
[dcosadmin@dcostest01 ~]$ sudo yum install -y docker-engine-1.13.1 docker-engine-selinux-1.13.1
Loaded plugins: fastestmirror
Loading mirror speeds from cached hostfile
 * base: muug.ca
 * extras: muug.ca
 * updates: mirror2.evolution-host.com
Resolving Dependencies
--> Running transaction check
---> Package docker-engine.x86_64 0:1.13.1-1.el7.centos will be installed
---> Package docker-engine-selinux.noarch 0:1.13.1-1.el7.centos will be installed
--> Finished Dependency Resolution

Dependencies Resolved

====================================================================================================
 Package                       Arch           Version                      Repository          Size
====================================================================================================
Installing:
 docker-engine                 x86_64         1.13.1-1.el7.centos          dockerrepo          19 M
 docker-engine-selinux         noarch         1.13.1-1.el7.centos          dockerrepo          28 k

Transaction Summary
====================================================================================================
Install  2 Packages

Total download size: 19 M
Installed size: 19 M
Downloading packages:
(1/2): docker-engine-selinux-1.13.1-1.el7.centos.noarch.rpm                  |  28 kB  00:00:00
(2/2): docker-engine-1.13.1-1.el7.centos.x86_64.rpm                          |  19 MB  00:00:06
----------------------------------------------------------------------------------------------------
Total                                                               2.8 MB/s |  19 MB  00:00:06
Running transaction check
Running transaction test
Transaction test succeeded
Running transaction
  Installing : docker-engine-selinux-1.13.1-1.el7.centos.noarch                                 1/2
libsemanage.semanage_direct_install_info: Overriding docker module at lower priority 100 with module at priority 400.
  Installing : docker-engine-1.13.1-1.el7.centos.x86_64                                         2/2
  Verifying  : docker-engine-selinux-1.13.1-1.el7.centos.noarch                                 1/2
  Verifying  : docker-engine-1.13.1-1.el7.centos.x86_64                                         2/2

Installed:
  docker-engine.x86_64 0:1.13.1-1.el7.centos   docker-engine-selinux.noarch 0:1.13.1-1.el7.centos

Complete!
[dcosadmin@dcostest01 ~]$ sudo systemctl start docker
[dcosadmin@dcostest01 ~]$ sudo systemctl enable docker
Created symlink from /etc/systemd/system/multi-user.target.wants/docker.service to /usr/lib/systemd/system/docker.service.
[dcosadmin@dcostest01 ~]$
- Test that Docker is properly installed:
[dcosadmin@dcostest01 ~]$ sudo docker ps
CONTAINER ID        IMAGE               COMMAND             CREATED             STATUS              PORTS               NAMES
[dcosadmin@dcostest01 ~]$
Additional Centos Command to help
Create 4 VMs in FreeESX as described above
To change network setting, use nmtui

To see the ethernet card list, enter nmcli d
restart ssh shell daemon
service restart sshd
- Search Package using "whatprovides"
Use yum whatprovides, with the absolute path to the file you want (which may be wildcarded). For example:
yum whatprovides '*bin/grep'
Install DC-OS
Create SSh Private / Publick key
Make sure to run ssh-copy-id to all 4 nods include master node itself.
[dcosadmin@dcostest01 ~]$ ssh-keygen -t RSA
Generating public/private RSA key pair.
Enter file in which to save the key (/home/dcosadmin/.ssh/id_rsa):
Created directory '/home/dcosadmin/.ssh'.
Enter passphrase (empty for no passphrase):
Enter same passphrase again:
Your identification has been saved in /home/dcosadmin/.ssh/id_rsa.
Your public key has been saved in /home/dcosadmin/.ssh/id_rsa.pub.
The key fingerprint is:
46:00:32:1f:95:1e:5d:e6:7b:f0:8c:9e:74:01:9b:df dcosadmin@dcostest01.test.flairpackaging.com
The key's randomart image is:
+--[ RSA 2048]----+
|  o oooo .+      |
|   + .o..o +     |
|    .. .. = .    |
|      ..   B o   |
|        S + * E  |
|       . o +     |
|          o      |
|                 |
|                 |
+-----------------+
[dcosadmin@dcostest01 ~]$
[dcosadmin@dcostest01 ~]$ cd .ssh
[dcosadmin@dcostest01 .ssh]$ ls
id_rsa  id_rsa.pub
[dcosadmin@dcostest01 ~]$
[dcosadmin@dcostest01 .ssh]$ ssh-copy-id 172.16.110.20
The authenticity of host '172.16.110.20 (172.16.110.20)' can't be established.
ECDSA key fingerprint is 90:29:39:4f:a0:97:db:2f:3c:4c:46:41:e5:e3:00:85.
Are you sure you want to continue connecting (yes/no)? yes
/usr/bin/ssh-copy-id: INFO: attempting to log in with the new key(s), to filter out any that are already installed
/usr/bin/ssh-copy-id: INFO: 1 key(s) remain to be installed -- if you are prompted now it is to install the new keys
dcosadmin@172.16.110.20's password:

Number of key(s) added: 1

Now try logging into the machine, with:   "ssh '172.16.110.20'"
and check to make sure that only the key(s) you wanted were added.

[dcosadmin@dcostest01 .ssh]$ ssh-copy-id 172.16.110.30
/usr/bin/ssh-copy-id: INFO: attempting to log in with the new key(s), to filter out any that are already installed

/usr/bin/ssh-copy-id: WARNING: All keys were skipped because they already exist on the remote system.

[dcosadmin@dcostest01 .ssh]$

[dcosadmin@dcostest01 .ssh]$ ssh-copy-id 172.16.110.31
The authenticity of host '172.16.110.31 (172.16.110.31)' can't be established.
ECDSA key fingerprint is c7:d7:6b:5b:92:1c:17:61:1a:55:ab:98:75:9a:dc:19.
Are you sure you want to continue connecting (yes/no)? yes
/usr/bin/ssh-copy-id: INFO: attempting to log in with the new key(s), to filter out any that are already installed
/usr/bin/ssh-copy-id: INFO: 1 key(s) remain to be installed -- if you are prompted now it is to install the new keys
dcosadmin@172.16.110.31's password:
Permission denied, please try again.
dcosadmin@172.16.110.31's password:

Number of key(s) added: 1

Now try logging into the machine, with:   "ssh '172.16.110.31'"
and check to make sure that only the key(s) you wanted were added.

[dcosadmin@dcostest01 .ssh]$ ssh-copy-id 172.16.110.32
The authenticity of host '172.16.110.32 (172.16.110.32)' can't be established.
ECDSA key fingerprint is 90:29:39:4f:a0:97:db:2f:3c:4c:46:41:e5:e3:00:85.
Are you sure you want to continue connecting (yes/no)? yes
/usr/bin/ssh-copy-id: INFO: attempting to log in with the new key(s), to filter out any that are already installed
/usr/bin/ssh-copy-id: INFO: 1 key(s) remain to be installed -- if you are prompted now it is to install the new keys
dcosadmin@172.16.110.32's password:
Permission denied, please try again.
dcosadmin@172.16.110.32's password:

Number of key(s) added: 1

Now try logging into the machine, with:   "ssh '172.16.110.32'"
and check to make sure that only the key(s) you wanted were added.

[dcosadmin@dcostest01 .ssh]$
Once everything is set up properly, all agent computer can be login from master node
[dcosadmin@dcostest01 .ssh]$ ssh 172.16.110.30
Last login: Tue Apr 11 12:03:51 2017 from 172.16.20.20
[dcosadmin@dcostest02 ~]$ exit
logout
Connection to 172.16.110.30 closed.
[dcosadmin@dcostest01 .ssh]$ ssh 172.16.110.31
Last failed login: Tue Apr 11 12:08:07 MDT 2017 from 172.16.110.20 on ssh:notty
There was 1 failed login attempt since the last successful login.
Last login: Tue Apr 11 12:06:54 2017 from 172.16.20.20
[dcosadmin@dcostest03 ~]$ exit
logout
Connection to 172.16.110.31 closed.
[dcosadmin@dcostest01 .ssh]$ ssh 172.16.110.32
Last login: Tue Apr 11 12:04:26 2017 from 172.16.20.20
[dcosadmin@dcostest04 ~]$ exit
logout
Connection to 172.16.110.32 closed.
[dcosadmin@dcostest01 .ssh]$
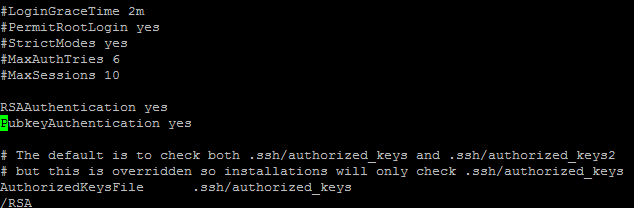
Need to update "sshd_config"
Create ip-detect script
Because the master computer is 172.110.20, set "Master_IP" address with that. This script will be uploaded through web page, so save this scrip to local computer.
I tested two scripts from the DC/OS manual, but I have no luck with the below script.
# no luck with this script. This script will try to check IP address from the master node.
#!/usr/bin/env bash
set -o nounset -o errexit -o pipefail
export PATH=/sbin:/usr/sbin:/bin:/usr/bin:$PATH
MASTER_IP=$(dig +short master.mesos || true)
MASTER_IP=${MASTER_IP:-172.16.110.30}
INTERFACE_IP=$(ip r g ${MASTER_IP} | \
awk -v master_ip=${MASTER_IP} '
BEGIN { ec = 1 }
{
  if($1 == master_ip) {
    print $7
    ec = 0
  } else if($1 == "local") {
    print $6
    ec = 0
  }
  if (ec == 0) exit;
}
END { exit ec }
')
echo $INTERFACE_IP
Spent almost more than week and finally completed the installation with this script. Make sure to put right interface name on this script. Most Linux system uses eth0 as default interface name, but Centos from my installation uses ens160 as the name.
#!/usr/bin/env bash
set -o nounset -o errexit
export PATH=/usr/sbin:/usr/bin:$PATH
echo $(ip addr show ens160 | grep -Eo '[0-9]{1,3}\.[0-9]{1,3}\.[0-9]{1,3}\.[0-9]{1,3}' | head -1)
Install
- Download the DC/OS installer to your bootstrap node.
[dcosadmin@dcostest01 ~]$ curl -O https://downloads.dcos.io/dcos/stable/dcos_generate_config.sh
  % Total    % Received % Xferd  Average Speed   Time    Time     Time  Current
                                 Dload  Upload   Total   Spent    Left  Speed
100  791M  100  791M    0     0  3402k      0  0:03:58  0:03:58 --:--:-- 4258k
[dcosadmin@dcostest01 ~]$ chmod 755 dcos_generate_config.sh
- From your terminal, start the DC/OS GUI installer with this command.
sudo bash dcos_generate_config.sh --web -v
Installation Page

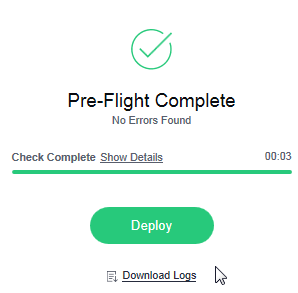
Preflight Page

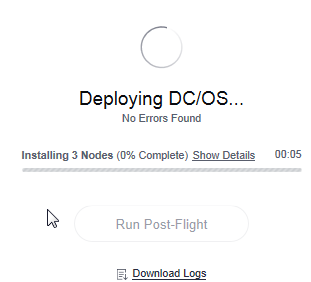
Deploy Page

Post-Flight Page

Summary
So excited to test new modern software data center technology and I will try to keep posting how all new fun stuff can be utilied in the DC/OS platform.


Comments
Post a Comment