Posts

Showing posts from 2017

Build React Native App (4) - Redux, Jest, and NativeBase
Image
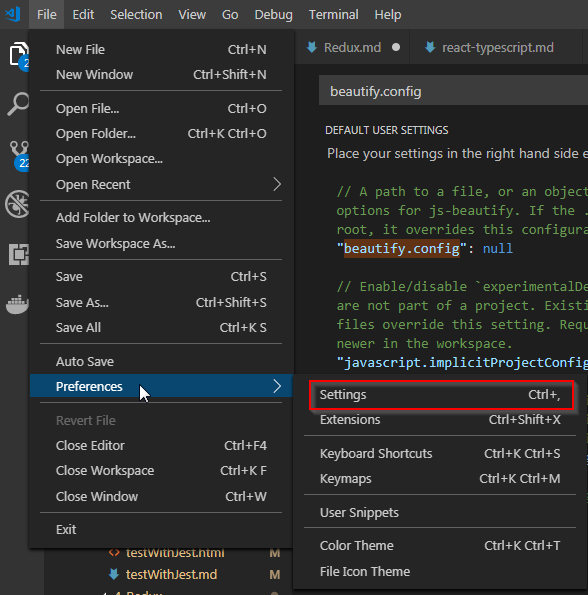
From this blog, typescript feature will be added. There are couple of ways to implement static type checking like; flow from facebook, PropTypes and Typescript. Typescript is well integrated with Visual Studio Code and supports better linter, error messages, and intellisense. Reference site Github Sample Ex4 Currnet version D:\GitRepo\reactnative>npm --version 6.3.0 D:\GitRepo\reactnative>react-native --version react-native-cli: 2.0.1 react-native: n/a - not inside a React Native project directory D:\GitRepo\reactnative>yarn --version 1.9.4 Creating React Native App $ react-native init ex4 If you want to specify the version, add "--version 0.57.3" at the end. Add NativeBase to React Native $ npm install native-base --save ... + native-base@2.8.1 added 71 packages from 42 contributors, removed 50 packages, updated 829 packages and audited 34989 packages in 138.542s found 0 vulnerabilities $ $ yarn yarn install v1.9.4 warning package-lock.json found. You

Show Filter/Lookup/Search result to TextBox/Label in PowerApp

Introduction I tried show data from Filter, but having hard time to display this data to text or label box. This will show you how to do it. Error: Property expected Text values, but this rule produces incompatible Table values The return result from Lookup, Filter or Search is table type and this can't be diplayed directly to the text or label box. To show this you will need to specify the record which you want to display. First/FirstN/Last/LastN function The First function returns the first record of a table. The FirstN function returns the first set of records of a table; the second argument specifies the number of records to return. The Last function returns the last record of a table. The LastN function returns the last set of records of a table; the second argument specifies the number of records to return. First and Last return a single record. FirstN and LastN return a table, even if you specify only a single record. Defining data using ClearCollect ClearCo

How to populate list of dropdown from PowerApp

Image
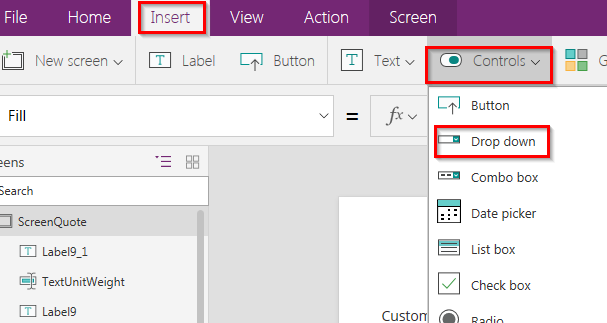
Introduciton To show the list of dropdown, the data should be defined in advance by static or from somewhere such as DB or rest. Collect, Clear, and ClearCollect function There are three functions in Powerapp related to defining and clearing data Collect: This will add list to existing data whenever it is called. Clear: Reset data ClearCollect: This is combination of Clear and Collect. This will reset existing data and will add new value Defining data for dropdown Add dropdown to the canvas Click advanced from properties Define list of data at "OnSelect" function ClearCollect(ItemDropdownList, "Item1", "Item2", "Item3") Link the List to dropdown list from "Items" Textbox ItemDropdownList Dropdown result Summary This is most simple way to show dropdown list and if you use UpdateContext or other functions, you can poplulate data from REST API.

Running Spring Boot as Windows Service

Download windows service wrapper Go to below site and download latest version Spring Boot Windows Wrapper Tool Link Spring Boot Window Wrapper Github link Youtube Video Comming soon Create XML file for the service xml sample file <service> <id>SpringSerivce</id> <name>SpringSerivce</name> <description>Running Spring Boot from Windows Service</description> <env name="SPRINGSERVICE_HOME" value="%BASE%"/> <executable>java</executable> <arguments>-Xrs -Xmx256m -jar "%BASE%\SpringService.jar" --httpPort=8080</arguments> <logmode>rotate</logmode> </service> Rename downloaded file The original filename will be winsw.exe to SpringService.exe file Make sure that xml file and the renmaed executable file is at the same location Register as Windows Service Open terminal prompt SpringSerivce.exe install Go to windo

Convert CSV to Java Obejct with Spring(1) - Comma or Tab delimiter with OpenCSV

Image
Introduction Spring batch provides tools to load csv, but I need really simple solution to load CSV to import some of data. From this tutorial, I will show you how to load CSV file to Java Object List. Tools Spring STS Java OpenCSV Reference Open CSV Youtube video OpenCSV Annotation and Mapping Strategy This statement came from OpenCSV manaul The most powerful mechanism opencsv has for reading and writing CSV files involves defining beans that the fields of the CSV file can be mapped to and from, and annotating the fields of these beans so opencsv can do the rest. In brief, these annotations are: CsvBindByName: Maps a bean field to a field in the CSV file based on the name of the header for that field in the CSV input. CsvBindByPosition: Maps a bean field to a field in the CSV file based on the numerical position of the field in the CSV input. CsvCustomBindByName: The same as CsvBindByName, but must provide its own data conversion class. CsvCustomBindByPosition: The s

Build Spring Boot and Angular Example(2) - Running Spring Boot and Angular from one package

Image
Introduction This will show how to run Angular 4 from SpringBoot tomcat server. Angular CLI uses Webpack technology and allows to bundle all Javascripts and CSS files into couple of files and this will make easy to run the application from Tomcat Server. Reference This blog YOUTUBE Video Build SpringBoot and Angular Application(1) - Setup Environment Build SpringBoot and Angular Application(1) - Setup Environment YOUTUBE Video SpringBoot Document for @RestController SpringBoot REST Example What is @RestContoller Annotation Below statement from the Spring Documentation. Creating REST Controllers with the @RestController annotation It’s a very common use case to have Controllers implement a REST API, thus serving only JSON, XML or custom MediaType content. For >>convenience, instead of annotating all your @RequestMapping methods with @ResponseBody, you can annotate your controller Class with >>@RestController. @RestController is a stereotype annotation th

Upgrade DCOS from 1.9 to 1.10

Image
Reference DC/OS 1.10 Manual Youtube demonstration Install Check current version Go system->System Overview to see the version Preparation Current bootstrap folder [dcosadmin@dcotest01 ~]$ ls ceph dcos_generate_config.sh genconf dcos-genconf.0ce03387884523f026-58fd0833ce81b6244f.tar dcos-install.tar jq [dcosadmin@dcotest01 ~]$ Create new version folder and copy config.yaml and ip-detect [dcosadmin@dcotest01 ~]$ mkdir dcos1-10 [dcosadmin@dcotest01 ~]$ cd dcos1-10 [dcosadmin@dcotest01 dcos1-10]$ ls ../genconf/ cluster_packages.json config.yaml serve/ state/ config.upgrade.yaml ip-detect ssh_key [dcosadmin@dcotest01 dcos1-10]$ mkdir genconf [dcosadmin@dcotest01 dcos1-10]$ cd genconf [dcosadmin@dcotest01 genconf]$ cp ../../genconf/config.yaml . [dcosadmin@dcotest01 genconf]$ cp ../../genconf/ip-detect . [dcosadmin@dcotest01 genconf]$ ls config.yaml config.yaml [dcosadmin@d

Build SpringBoot and Angular Example(1) - Set up environment

Image
title: Build Spring Boot and Angular Example(1) - Set up environment tags: AngularJS 4 Angular Angular CLI Spring Boot Bootstrap Typescript date: Sep 9, 2017 Build SpringBoot and Angular Application(1) - Set up environment Introduction Lots of article explained how to build AngularJS or Spring Boot separately, but I couldn't find any good article how I can package these two components together and running from one package. The best way to do this is to separate back-end and front-end using REST api and packaging as one. Spring Boot has built-in components, so both front-end and back-end will be running from the Spring Boot Web components. Reference Youtube Link Angular CLI NodeJS Bootstrap 4 Development Environment For the Spring Boot app(Back End), STS IDE will be used. For the AngualarJS 2(Front End), following technologies will be used; Typescript Bootstrap 4 AngularJS 4 AngularJS CLI NodeJS Visual Studio Code There is another way to develop UI us

Adding SOAP Header generated by JAXB(wsimport)

Adding SOAP Header generated by JAXB(wsimport) Introduction Recently, I've been working with Exact Web Service and needed to add SOAP header entry from the source files generated by wsimport tool. To access Globe database, I needed to add database server name and database name from SOAP Header. I tried to find out lots of article and this is the way to add headers into SOAP. Reference There was one excellent site, but I couldn't find it any more. If I find it, I will update here. The steps Add jaxws-api (2.2.12) to POM file Add jaxws-maven-plugin to POM file to generate java code from WSDL Add SOAPHanlder class to intercept during sending messages To add SOAPHandler, get handler from JAXB service Call Service 1. Add jaxws-api <dependencies> <dependency> <groupId>junit</groupId> <artifactId>junit</artifactId> <version>4.12</version> </dependency> <dependency> <groupId>com.fasterxm

Installing Ceph docker plugin to DCOS using Rex-Ray

Image
Installing Ceph docker plugin to DCOS using Rex-Ray Introduction From the previous blog, DC/OS 1.9 and Ceph have been installed. To install Jenkins using external volume, I decided to use Rex-Ray because most of other plugins have not been maintained properly to support latest version. Reference dcos-rexray Marathon rexray Configuring docker to use rexray and Ceph for persistent storage Rex-ray configuration generator rexray Docker volume plug-ins Install Rex-Ray [dcosadmin@dcotest02 ~]$ sudo su - Last login: Mon Jun 26 12:50:35 MDT 2017 from 172.16.110.20 on pts/0 [root@dcotest02 ~]# curl -sSL https://dl.bintray.com/emccode/rexray/install | sh INFO[0000] updated log level logLevel=info INFO[0000] exiting process time=1498592066094 rexray has been installed to /usr/bin/rexray INFO[0000] updated log level logLevel=info REX-Ray ------- Binary: /usr/bin/rexray Flavor: client+agent+controlle

Install Ceph shared storage to DCOS 1.9

Image
After installing DC/OS, I noticed that all data worked with container stored to local node. Due to the reason, when the container was moved from one node to antoher, all configuration has been lost. I tried to find out shared storage solution and this manual is regarding how to add CEPH open source platform to CentOS DC/OS platform Reference Ceph Script on DC/OS Ceph on DC/OS losetup manual Checking file system type in Linux Ceph example from DCOS 1.8 Ceph example from DCOS 1.9 bash_rc vs profile Install lightttpd rbd-docker-plugin Current configuration As I posted from previous DC/OS blog, my configuration is I used 4 nodes as DC/OS recommended ComputerName IP Addess Computer Spec Description Note dcostest01 172.16.110.20 2 core, 16GB, 100 GB Disk Bootstrap Computer Ceph Client & DC/OS CLI will be in here dcostest02 172.16.110.30 2 core, 16GB, 100 GB Disk Agent1-Master dcostest03 172.16.110.31 2 core, 16GB, 100 GB Disk Agent1-Private Ag