From this blog, typescript feature will be added. There are couple of ways to implement static type checking like; flow from facebook, PropTypes and Typescript. Typescript is well integrated with Visual Studio Code and supports better linter, error messages, and intellisense. Reference site Github Sample Ex4 Currnet version D:\GitRepo\reactnative>npm --version 6.3.0 D:\GitRepo\reactnative>react-native --version react-native-cli: 2.0.1 react-native: n/a - not inside a React Native project directory D:\GitRepo\reactnative>yarn --version 1.9.4 Creating React Native App $ react-native init ex4 If you want to specify the version, add "--version 0.57.3" at the end. Add NativeBase to React Native $ npm install native-base --save ... + native-base@2.8.1 added 71 packages from 42 contributors, removed 50 packages, updated 829 packages and audited 34989 packages in 138.542s found 0 vulnerabilities $ $ yarn yarn install v1.9.4 warning package-lock.json found. You...
Automation with Ansible (2) - Create/Provisioning Virtual Machine using vsphere_client from VSphere environment
- Get link
- X
- Other Apps
Creating/Provisioing VM using ansible
From this tutorial, I will demonstrate how to create empty VM using vsphere_client module. This is really simple example and most configuration file came from Ansible document
Reference
- Ansible vshper_client{:rel=nofollow}
- Github code
Installing pysphere module
As specified from the above reference, we need to install pysphere module from python.
[ansible@ansible01 ~]$ sudo pip install pysphere
Collecting pysphere
Downloading pysphere-0.1.7.zip (516kB)
100% |████████████████████████████████| 522kB 977kB/s
Installing collected packages: pysphere
Running setup.py install for pysphere ... done
Successfully installed pysphere-0.1.7
[ansible@ansible01 ~]$
Checking VCenter options
From the above reference, we will need to prepare following parameteres from VCenter.
- vcenter_hostname: this is the vcenter server name. In my case FLCATSVCT01(10.200.0.11)
- username: login for vcenter
- password: password for vcenter
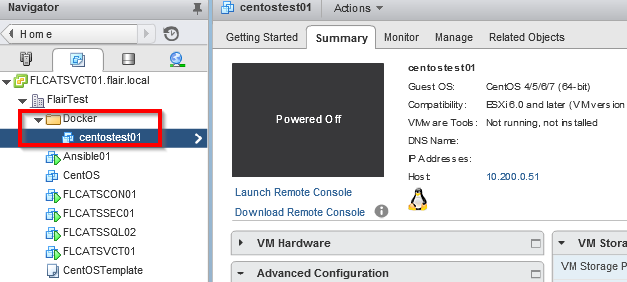
- guest: guest name. For this testing, I will use "centostest01"
- state: powered_on or powered_off
- folder under vm_extra_config: I am going to put the VM under "Docker" folder, so the name will be "Docker" for this testing
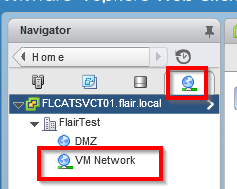
- network from vm_nic: network name. For this testing, "VM Network".
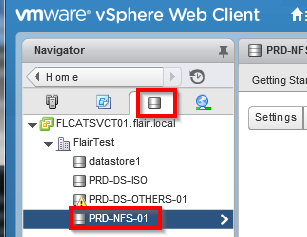
- datastore: This is the storage name. Check the datacenter name from vSphere Web Client. For this, I am going to use "PRD-NFS-01"
- folder under vm_disk: This option doesn't work for me. All VM is created under root folder.
- datacenter from esxi: FlairTest.
- hostname from esxi: esx host IP. For this testing, 10.200.0.51
sample centostest.yml to create new vm
---
- name: Create VM
hosts: localhost
connection: local
tasks:
- name: createVM
vsphere_guest:
vcenter_hostname: 10.200.0.11
validate_certs: no
username: vsphere_login
password: vsphere_password
guest: centostest01
state: powered_off
vm_extra_config:
vcpu.hotadd: yes
mem.hotadd: yes
notes: This is a test VM for centos
folder: Docker
vm_disk:
disk1:
size_gb: 20
type: thin
datastore: PRD-NFS-01
vm_nic:
nic1:
type: vmxnet3
network: VM Network
network_type: standard
vm_hardware:
memory_mb: 2048
num_cpus: 2
osid: centos64Guest
scsi: paravirtual
esxi:
datacenter: FlairTest
hostname: 10.200.0.51
Result
We didn't specify the hosts for this testing. Ignore the warning message.
[ansible@ansible01 test]$ ansible-playbook createvmtest.yml
[WARNING]: Unable to parse /etc/ansible/hosts as an inventory source
[WARNING]: No inventory was parsed, only implicit localhost is available
[WARNING]: provided hosts list is empty, only localhost is available. Note that the
implicit localhost does not match 'all'
PLAY [Create VM] **************************************************************************
TASK [Gathering Facts] ********************************************************************
ok: [localhost]
TASK [createVM] ***************************************************************************
changed: [localhost]
PLAY RECAP ********************************************************************************
localhost : ok=2 changed=1 unreachable=0 failed=0
[ansible@ansible01 test]$
Summary
From this example, we created new vm using Ansible successfully. One of issue on this is that an OS is not installed yet. From next tutorial, we will create new VM by copying new VM from existing template.
- Get link
- X
- Other Apps
Popular posts from this blog
Build React Native App (4) - Redux, Jest, and NativeBase
From this blog, typescript feature will be added. There are couple of ways to implement static type checking like; flow from facebook, PropTypes and Typescript. Typescript is well integrated with Visual Studio Code and supports better linter, error messages, and intellisense. Reference site Github Sample Ex4 Currnet version D:\GitRepo\reactnative>npm --version 6.3.0 D:\GitRepo\reactnative>react-native --version react-native-cli: 2.0.1 react-native: n/a - not inside a React Native project directory D:\GitRepo\reactnative>yarn --version 1.9.4 Creating React Native App $ react-native init ex4 If you want to specify the version, add "--version 0.57.3" at the end. Add NativeBase to React Native $ npm install native-base --save ... + native-base@2.8.1 added 71 packages from 42 contributors, removed 50 packages, updated 829 packages and audited 34989 packages in 138.542s found 0 vulnerabilities $ $ yarn yarn install v1.9.4 warning package-lock.json found. You...
Replacing text in PDF file using iTextSharp
ReplacingTextUsingITextSharp title: Replacing text in PDF file using iTextSharp tags: - PDF - Replace Text - iTextSharp date: Nov 11, 2016 Overview I’ve trying to replace text in PDF file and this is most simple way to replace text in PDF files. Before approaching this, I’ve tried to replace text using command toolkit with pdftk, qpdf to decrypt, and sfk181 to replace string with new, but this approach faced couple of issues; 1. font, 2. text area size. After long investigation, this may be easy way to replace text. Put white colored rectangle on top of string and stamp text on the location like erase text using whitner and write on top of it. Tools Visual Studio 2013 C# iTextSharp Code using System; using System.Collections.Generic; using System.Linq; using System.Text; using System.Threading.Tasks; using iTextSharp.text.pdf; using iTextSharp.text.pdf.parser; using iTextSharp.text; using System.IO; namespace EMTechnicalDieline { class Program ...
Using GIT(Bitbucket), Visual Studio Code
Concept of Git Git has two repositories; local and remote. Two different commands type to commit the changes; 1. commit/add: load/save changes to the local repository. 2. push/pull/clone: load/save changes from/to remote repository. How to setup remote git server , bitbucket , with Visual Studio Code To use git, I downloaded it from [git-scm](“ https://git-scm.com/downloads “) and installed with bash mode to keep the comparability for different platform. Set up remote repository * Create project from bitbucket. In this case, I created “blogmarkdown”. Remember the URL for the git repository. To find out the repository, just add “.git” at the end of the URL from bitbucket. For me, it will be “ https://alexjoh@bitbucket.org/alexjoh/blogmarkdown.git ” Link the remote with local folder * Create local folder. In my case, I created d:\gitrepo Initialize git local repo. Change the folder to the gitrepo and run git init If there are existing files from a remote git re...
Comments
Post a Comment